Fake Tan Fave!

Hello beauties!

If you know me you know I can’t be without a tan, whether it be real or fake (mostly fake, damn pale genes). Don’t get me wrong, some people really suit the pale ‘English rose’ look, but not me. If I leave the house in my natural, pale form, I look like I died two weeks ago. Okay, maybe a slight exaggeration, but I do look pretty shitty.

Having a golden glow makes me feel 1. healthier 2. thinner. Obviously, it has to be a natural looking fake tan, not orange oompa loompa. Thankfully fake tan has developed over recent years, and there are a lot of really good products out there to get a natural bronzed look depending on what suits you. I like a medium/dark tan, but I’ve always struggled in finding one that ticks all the boxes.

  1. Dark but not orange or mud looking.
  2. Applies easily with no streaking.
  3. No typical fake tan ‘biscuit’ smell.
  4. Fades evenly without going patchy.
  5. Doesn’t cost a fortune due to using it regularly.

I have tried a number of brands; St Tropez, Fake Bake, St Moriz, NKD SKN, Vita Liberta, Rimmel just to name a few.

They all have pros and cons, mainly cons. I was mostly disappointed with the likes of St Tropez and Vita Liberta, being the ‘higher class’ of fake tan. I have used the normal St Tropez Mousse and the darker version. The normal one barely bronzed me and the dark one turned me into The Hulk. The darker version has green undertones to counteract the ‘orange’ tinge… the tan was actually green and left me looking like I was suffering with a serious disease.

I was recommended Vita Liberta by my Auntie who always has a lovely dark bronzed colour. She claimed there was no fake tan smell at all, but it was £37 a bottle. At the top of my price range, I was adamant I wasn’t going to try it, but it only took me a few seconds to cave and purchase… However, once again I was left underwhelmed. There was still a weird smell and I definitely didn’t look like the same golden goddess as my Auntie. I did forget, however, she just tans really well so this probably helped with her overall look.

So this brings me onto a tan that I’ve found that I absolutely love. I feel it does tick all the boxes listed above. It’s called Cocoa Brown by Marissa Carter; a favourite of blogger babe Sarah Aschroft.

image

I’ve been wearing it now for about a year, and whenever I try something new I always go back to this. I wear the 1 Hour Tan Mousse in dark; The normal version isn’t dark enough for me. It goes on lovely, colours instantly and is a really nice dark (but natural) shade. It does have a slight smell, I don’t think there will ever be a fake tan that doesn’t smell, but it’s not unpleasant at all. If you look after your tan, exfoliating and moisturising regularly, it lasts a good 5-7 days and fades evenly. You can build the layers to get an even darker application.

Here’s a before and after of one application.


The good thing about this tan is when you shower, it doesn’t wash away that dark bronzed colour. A lot of fake tan’s I have used give an appearance of being really dark, and then you wash the guide colour off and you look as pale as before!

So girls (and guys!), if you’re sad the Summer is over and want to keep that bronzed glow all year round, give Cocoa Brown a try if you haven’t already. You can grab it from Superdrug and it’s only £7.99 a bottle! There’s a range of fab products in the collection, there’s normally some offers on so definitely worth stocking up!

If you have any other recommendations worth trying, I’d love to hear from you as I’ll always be willing to try a new product! I’m specifically looking to try a really good fake tan for your face, as I have yet to find one.

Beth x


Beauty-ful in Vegas!

Okay, so this blog post is a little different to anything I’ve done before. I’ve teamed up with Vegas.com to talk about transitioning your makeup from day to night when visiting Sin City!

Vegas is high up on my travel wish list, and after doing my research for this blog, I need to get on that plane ASAP! There are so many great Vegas deals to make anyones experience something to remember. Hotels with clubs/theatres/shopping malls/endless restaurants/casinos and even GONDOLAS all inside. The pool parties, shows, sights, tours, nightlife all draw my attention one way… VEGAS BABY!!!

I don’t need to have been myself, however, to tell you that it is hot… ohhhhh so hot. So this is where I begin with my tips on keeping your Vegas look in place from day to night.

When browsing through vegas.com for inspiration, the one hotel that stood out for me was The Venetian. Described as ‘over-the-top Italian elegance’, the Venetian boasts luxury and opulence in every corner.
I have taken inspiration from the rich golden colour scheme that is throughout some of the hotel. No matter what you are up to in the day in Vegas, a golden bronzed look will always slay.

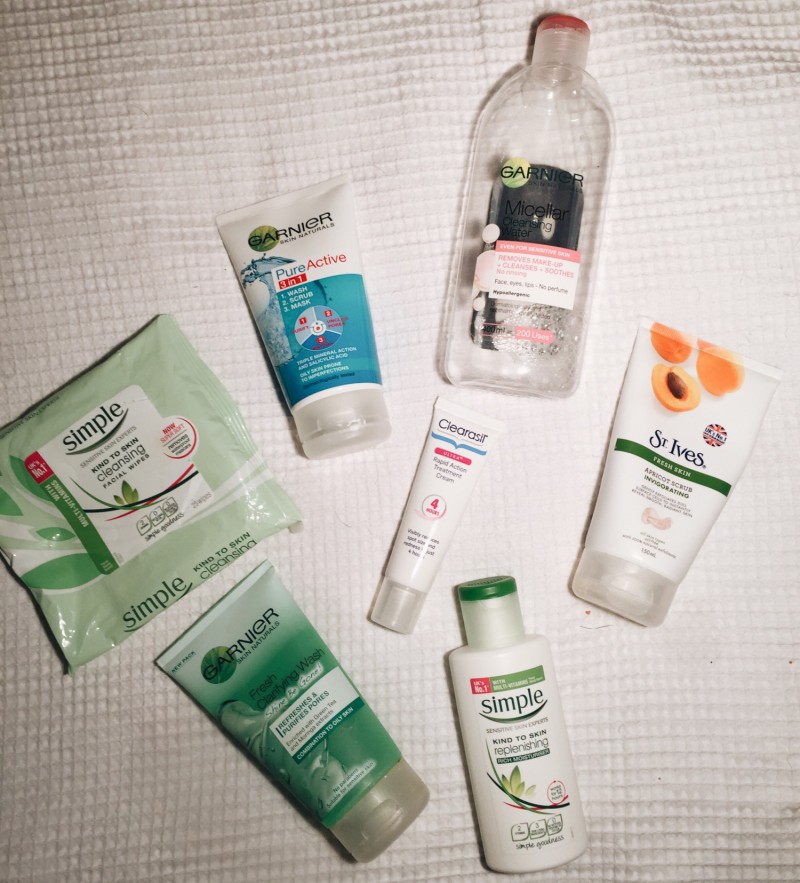
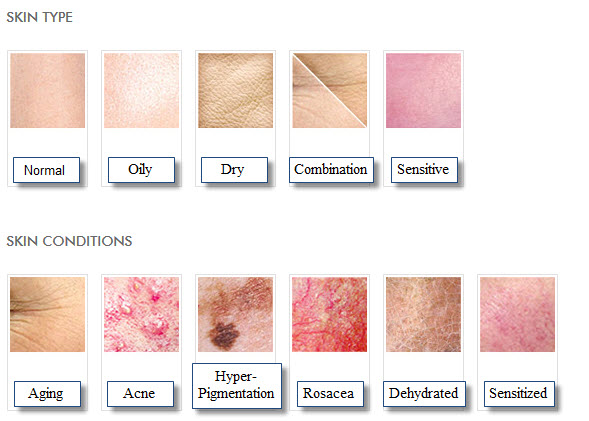
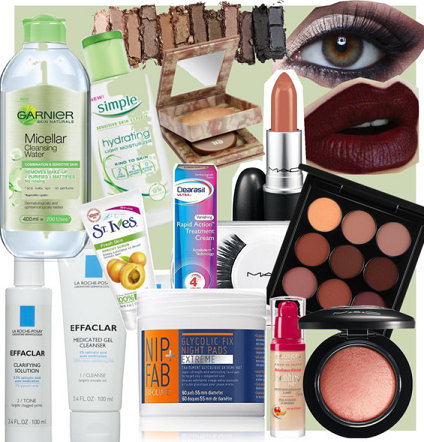
It is important to focus on skincare during the day; good skincare is the base for good makeup.  Make sure you choose suitable skincare products for your skin type as this can be the first steps into keeping your makeup looking flawless all day. No matter what skin type you are, it is essential for you to be wearing a really good SPF.

I have based my day look around what I would get up to in Vegas. A bit of exploring in the morning, shopping, taking a gondola ride (yes, you can ride on gondolas IN the hotel) and then getting my bikini on ready to hit the pool party at Tao Beach.
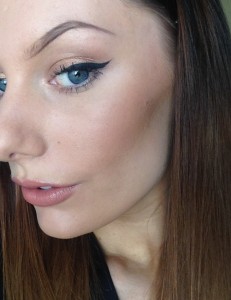
VEGAS BY DAY

Less is more…

Focus on healthy, glowing, bronzed skin and long lashes. Caking on the makeup in the day will only make you look like you should be a member of the cirque du soleil; the melting face act. I started with The Body Shop’s SPF 30 moisture-protect emulsion from the Vitamin E range. This stuff is great because it is super lightweight and doesn’t feel greasy on the skin at all. Then I applied MAC’s Oil Control Lotion; I have oily skin and teaming this with the heat of Vegas is a disaster waiting to happen. Use products that will help battle the heat, especially if you have oily skin like me.

A lot of people would use a primer to help keep their makeup in place all day. Now, you may gasp in horror, but I have shunned all face primers. I feel that primers (on my skin anyway) increase makeup movement, creating crease lines and patchy foundation… NOT ATTRACTIVE! Add this to the heat of Vegas, my makeup will barely see it past lunch, let alone sunset.
I do recommend, however, using an eyeshadow primer. Urban Decay do a really good range of eyeshadow primers that do help prevent that crease mark from forming on your eyelid.

I would go for a lighter foundation, such as Urban Decay’s Naked Skin foundation. Apply thinly and then use a good concealer to hide the evidence of last night’s late night (or early morning should I say). I would recommend NYX Cosmetics concealer wand; I have been using this for a few months now and literally would not use anything else. To set your base, use a good translucent powder, but don’t overdo it!! I use one by MAC from the Prep and Prime range.

Get your brows on point; when rocking a more minimal eye makeup look, good brows are even more important.

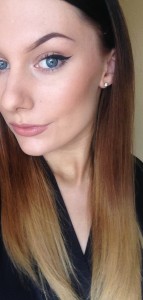
I used the Urban Decay Smoky eyeshadow palette to create a golden bronzed look on my eyelids. I’m loving the eyeshadow only look right now and if you are planning on going to one of Vegas’ famous pool parties, eyeliner is a massive NO NO. Leave that for the night, like I say, less is more.

Invest in some good false eyelashes to make your eyes pop. I really like the Ardell Wispies; I apply them under my natural lash line for a more natural finish (see previous blog post!)
You also need to invest in some really good eyelash glue to help keep them in place all day and all night. I use the Duo eyelash glue and this stuff does just that.

I apply MAC’s Global Glow Skinfinish Bronzer to my cheek bones, temples and jaw line. I literally can’t get enough of this stuff when I’m somewhere hot and sunny, it looks amaaaazing in sunlight! I think you can definitely get away with going slightly overboard with the bronzer and highlight in Vegas! I use the Urban Decay Naked Illuminated powder to highlight. I finished the look with NYX Cosmetics Liquid Suede Lipstick in shade 07. A liquid lipstick lasts, so is a good choice for when you have a drink to your lips all day. Unlike other liquid lipsticks that dry and crust (mentioning no names.. Anastasia Beverly Hills), the ones by NYX are matte without being drying or going flaky.  And they don’t cost a lot either!WINNER.

Finally, one of the most important stages of your makeup application… SETTING SPRAY! Setting spray’s help to set your makeup and keep it where it should be for longer. It also help to get rid of any excess powder you may have used (I did warn you!) I use Urban Decay’s ‘All Nighter’ Setting Spray.
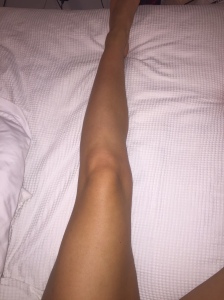
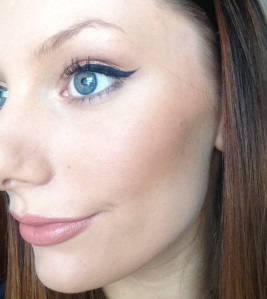
 

VEGAS BY NIGHT

So this look has been inspired by Voodoo Rooftop Nightclub. This place looks insane, who wouldn’t want to be partying 51 stories high with views of Vegas nightlife?! Out in the open of the night means I chose dark and mysterious eyes and deep plum lips, a complete contrast to Vegas by day.


So I have adapted my Vegas by day look as if I only had a quick 15 minutes before heading out again. The first thing I would do it get a clean tissue or blotting paper and gently press onto my skin to remove any excess oils on the surface. This will help to prevent any makeup that is applied on top looking cakey.

I would touch up my foundation where necessary with a more fuller coverage option, such as the Estee Lauder Double Wear. I always use a damp beauty blender for my foundation as it gives a more ‘airbrushed’ effect on the skin.

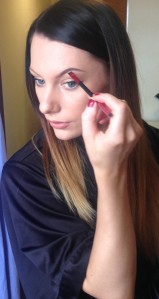
I applied tape (yes, very glamourous) to the outer edges of my eyes; this the perfect trick if you’re in a hurry but still want that sharp winged liner. I went back in with my Urban Decay Smoky eyeshadow palette and darkened the sockets of my eyelids with the shades ‘Black Market’, ‘Smoulder’ and ‘Password’ (UD definitely have the strangest collection of eyeshadow names!)

Wearing more neutral colours in the day means you can easily build on the night for a bolder, darker look. The tape means I can apply the liquid eyeliner quickly and evenly. I would then go in with a kohl eyeliner pencil for my waterline, apply some fresh mascara and that’s it. Oh and make sure to remove the tape...

As I said before, you can never have tooo much glow in Vegas, I would apply more bronzer to my cheekbones, temples and jawline. For an evening, I’d use a small amount of blusher too. I use MAC’s mineralise blusher in shade ‘Gleeful’. Obviously top it off with some more highlight!

Again, I used a NYX Cosmetics Liquid Suede Lipstick in shade 12; a deep burgundy colour.

Don’t forget to have another spray of your setting spray to make sure your night look last until morning. And then you’re ready to do it all over again. I always take some of the essentials out with me in my clutch bag; powder, lipstick, eyeliner.

So that’s it! I hope you’ve enjoyed reading my Vegas makeup tips, now I feel really depressed that I’m not actually there… So I’d love to hear your stories if you’ve been, I literally cannot wait to see it for myself one day!

Don’t forget to check out http://www.vegas.com if you are lucky enough to be taking a trip there soon, they have loads of deals and offers on everything you would want to do when visiting the famous Sin City…

Beth x


Game Changing False Eyelash Technique!

Two days ago, I came across a video on Instagram of a girl applying her false eyelashes to the underside of the lash line… My immediate reaction was ‘What?! How??? OMG THAT’S SO CLOSE TO HER EYEBALL?!?’ (Eyeball’s weird me out, especially when people touch them)

Now, I’m not a die hard false eyelash fan, but I do like them for a special occasions or a night out. I do think some false eyelashes, or the application, can make a person look worse than what they would without them… for example:

  1. The majorly obvious fake eyelashes that look like miniature fans attached to your eyelid… Oh, are you wearing false eyelashes? Couldn’t tell…
  2. When the actual strip of the false eyelashes isn’t blended in. Even worse if it’s wonky. Eeeeven worse if the strip has been applied no where near the natural lash line, and you can visibly see the natural lashes sticking out straight underneath..
  3. When the end of the lash strip closest to the inner corner of your eye starts to lift up and stick out.

Anyway, I’ve found some that I really like; they’re similar to the Ardell Wispies.  I get them from eBay for about £6-£7 and you get 5 pairs! They’re reusable as well so last me quite a while.

So after watching the Instagram video, I tagged my fellow false eyelash wearing pals into it, and we all agreed to give it a go on Saturday night.

Well, me being the impatient person I am, I couldn’t wait. I needed to know if this was going to be a game changer or just an eyeball blinder…

Verdict: MOTHER EFFIN GAME CHANGER!!

It is slighty trickier, but no less than the faff I normally have with false eyelashes. I trimmed my false eyelashes to fit and then cut it into 3 pieces.


I curled my natural eyelashes and coated them lightly with mascara.

I then used the Duo eyelash glue to carefully squeeze out a small amount along each strip. When I first did this, I applied the glue as usual. Then I realised that it’s now going to be stuck from underneath, so the glue needs to be on the opposite side of the strip. I waited 30 seconds for it to become tacky, and you do need them to be really tacky to avoid any sliding off (into your eyeball 😱😰)

Starting with the end piece, I pulled my natural lashes up and placed the false ones underneath my lash line. I left it for a couple of seconds then with my thumb and forefinger, pressed the false lashes and my natural lashes together.

I did the same for the other two pieces, giving them all an extra press together at the end to make sure they were firmly in place.

I then reviewed my efforts in the mirror…

As I said (shouted) before, GAME CHANGER.

They looked more natural, applied better than ever and there was no sign of the dreaded lash strip line or the bit that sometimes sticks out on the inner corner.

Now when I show you my results, please excuse how shitty my brows look. I never thought this would be something to blog about as I really didn’t expect this technique to work, hence the rushed brows from the morning and bags under my eyes. Also the photo quality. Like I said, I was unprepared OKAY?!


I was worried you would be able to feel the false lashes irritating your eye from underneath, but I didn’t at all. They look more like professional eyelash extensions.
I have nothing else to say other than give it a go if you haven’t already. I love hearing your feedback, so let me know what you think if you’ve tried it already (or if you haven’t, I appreciate all feedback!)

Beth x

Current Favourite Face Mask!

Following on from the amaaaazing whitening toothpaste I’ve been using (see previous post), I have managed to get my hands on a another little beauty of a product from the skincare company I am now working with. If you follow my blog you’ll know I have openly talked about my battles with my skin over the years. I have tried many different face masks from different brands in my time, even those DIY ones where you slap all sorts from your kitchen cupboard on to your face… say no more.

I purchased the Glacial Marine Mud Mask around 3 weeks ago, and have been using it 2-3 times a week. First of all, the bottle quantity is 200g and you can squeeze out 40 applications! So this already is a bonus for me, most masks I’ve bought in the past have lasted about 1 month at a push.

The mask has more than 50 skin beneficial minerals to purify and nurture the skin. Minute colloidal particles within the mask act as an emulsifying agent by forming a barrier around oily particles, allowing them to be removed. It is suitable for all skin types, including sensitive, and has also been used to help improve the appearance of scarring and stretch marks!

The mask is a really good consistency; it is quite runny when you apply it, so maybe do it in the bathroom to avoid any mess. Being a runnier texture means it really sinks into your pores, and you only need a thin layer. The bottle advises you to leave it on for 15-20 minutes, or until it is completely dry. I like to leave mine on a little longer (especially if I’m having an ugly day, ha).

The beauty of this product is you can actually SEE it drawing out the impurities and dirt from your pores as it dries! It’s soooo gross yet soooo satisfying, especially if you’re like me and love that kind of weird stuff (yes I am subscribed to Dr Pimple Popper’s YouTube channel…)

Another thing I love about this product is that is washes off so easily. I’ve found with many other masks you have to wash your face viciously for 20 minutes to remove it all, and then you still find traces of the stuff 5 hours later!

After I first used this product, I did break out a little, but I’m putting that down to the fact that it really draws the toxins out of your pores, therefore having to get worse before it gets better. I have seen a huge improvement in the blackheads on my nose, and a decrease in the size of my pores. The breakout has cleared now and my skin feels so much softer, I even took it to a spa day I went on with my friend because I love it that much!

image

It’s available to order from me (UK only) for £25, which as I said before should get you 40 applications. This should be enough to easily last you 6 months so a bargain really! I can also offer cute samples that can get you up to 3 applications; £3 or 2 for £5!

image

Beth x


Whitening Toothpaste That Works!

After starting my new business venture with an extremely successful skincare and beauty company, the first product I have put to the test is their Whitening Fluoride Toothpaste. It is a non-peroxide toothpaste that has been approved by dentists. It works by removing stains, returning your teeth back to their natural whiteness. It is suitable for sensitive teeth as the ingredients are natural and, as I said before, contain no peroxide. This means it is perfectly fine to use for children over the age of 6 and pregnant women. The toothpaste has been clinically proven, with 3 patents on it! So I was really looking forward to giving it a try for myself. I have quite sensitive teeth, so the product details gave me extra reassurance.

Directions state that it can take up to 28 days to see results, however most see them within a week. I saw results in just 3 days.

Image 1 – Pre-toothpaste.
Image 2 – 3 days after using toothpaste.
Image 3 and 4 – 1 week after using toothpaste.

As you can see, I’ve had amazing results from this toothpaste (photo’s not edited in any way). I thought I had white teeth before, obviously not! So many people have complimented me and I feel so much more confident. For me, having nice white teeth is a really important factor in my appearance, and a lot of professional teeth whitening treatments can be so expensive! Because of this, I have never had them whitened before, I have tried other toothpastes but I have never been very impressed.

I do look after my teeth, and I don’t really drink teeth-staining drinks such as coffee, red wine or sugary fizzy drinks. This may be the reason why the stains have lifted so quickly, so individual results may vary.

Now for the price… It’s only £12 a tube, which should last easily over a month. I have had mine for two weeks now and it barely feels like any has been used, and that’s with my boyfriend using it as well!

For my first product with the company, my expectations have been exceeded. I am so pleased that this toothpaste has done what it says as I’ll only ever recommend products that have actually worked for me.

If you want to know any more or place an order (as you can’t buy this toothpaste in stores), please don’t hesitate to ask! Follow me on social media for more frequent posts and images, especially Facebook! Posting charges will apply.

Here are some more real results from customers. Again, no images have been edited.

Beth x

image

My New Business Venture!

As a university student, working part-time as a sales advisor for New Look and volunteering part-time as digital marketing intern for a online CV building company, my income is pretty low. However, I seem to forget this minor problem and spend as if I’m earning that of someone in full-time employment…

I’m a self-confessed shopaholic. You know the one’s that have to hide parcels and shopping bags from eagle-eyed mom’s who shout “WHAT HAVE YOU BEEN BUYING NOW?!” or “YOU DON’T NEED ANY MORE CLOTHES!!!” at the sound of ruffling plastic bags containing sparkly new (much needed) items.

shopaholic

So a few weeks ago, I saw a friend on Facebook recommending a couple of products that took my interest. After having a brief conversation, it turns out she is now a product distributor for a reputable skincare and beauty company. They have been rated the 5th best company to work for worldwide by Forbes magazine. The products are all on-trend and trustworthy with professional approval. Her job is to recommend what she likes personally; if she takes any orders, she makes some commission. A quick and easy way to make extra money each month.

Being obsessed with skincare and beauty products I thought to myself, what a fantastic opportunity to be able to test new products and recommend them to friends and family at a discounted price AND boost my monthly income, so I don’t feel as guilty about buying another pair of shoes or another nude lipstick. I am constantly aiming to better myself working towards, what I hope, will be a successful career in business. My dream job is working in marketing for a skincare, beauty or fashion brand; this allows me to apply my current knowledge to a real life situation and market myself.

My new business venture has the ability to open a lot of new doors for me; I am free to recruit and build my own team of likeminded business women/men who are all determined to be successful and build a better future for themselves.

I am going to write blog posts in more detail of the products I am loving, so watch this space and you could be one of my first recruits…

Beth x

image


Top High Street Skincare Buys!

Evening all! This post includes my favourite high street skincare products. They are affordable AND actually benefit my skincare regime, so much so, I continue to purchase them no matter what other products I am testing.

  1. Garnier Fresh Clarifying Facial Wash

Processed with VSCOcam with a6 presetI discovered this about a year ago, I saw that it was for combination to oily skin (my skin type) which you don’t see often in facial washes. It’s normally about £3.50 from Superdrug, but they always have various deals so most of the time you can get it even cheaper or as part of a 3 for 2.

This is by far my favourite facial wash I have had from the high street. It cleanses really well and does keep shine at bay. It really suits my skin, sometimes changing to a new product can break you out but this didn’t, it kept my skin fresh and helped to keep it clear.


2. Simple Cleansing Facial Wipes

Processed with VSCOcam with t1 presetI use facial wipes every day. It is important to remove your make up before washing your face. If you don’t, your face wash can’t actually do what it should be doing to your skin as it has that barrier of make up to get through first. You wouldn’t get in the shower fully clothed and expect to come out clean now would you… get my point?!

I always remove my make up with these before I continue with my skincare routine. I have tried many other brands, and they just don’t compare to these. They have enough moisture to get the majority of my make up off, even that pesky waterproof mascara! They have never irritated my face and are gentle around the eyes.

I am a huge fan of Simple, they really are great for those of us with sensitive and problem skin.

3. Clearasil Rapid Action Spot Treatment Cream

Processed with VSCOcam with a6 presetOver the years I have used many different spot creams, each time I’m filled with the same optimistic thoughts of “I think this one is really going to work!!” and then I find myself as disappointed as always.

This one by Clearasil actually does work for me! It’s not the product for a full on acne outbreak, but the occasional few spots. I genuinely believe it reduces size and redness overnight, maybe not in 4 hours, but definitely overnight.

However, I am not normally a fan of Clearasil. They’re products are very strong, chemically smelling and always used to make my skin worse. But this is definitely a product that I would recommend.


4. Garnier Pure Active 3in1 Wash & Mask

Processed with VSCOcam with a6 presetThis is a 3in1 wash, scrub and mask. I only use it as a face mask as you don’t want to be exfoliating your skin every time you wash your face, that is a huge no-no!

I apply it like a mask, leave it for 15-20 minutes then rinse it off. This is such a good mask, it contains salicyclic acid (the best ingredient for problem skin) and white clay. I can feel it cleaning deep into my pores, tightening them and drawing out all of the impurities. This really helps to clean and clear my skin, and I feel it makes my pores less visible too!


5. Garnier Micellar Cleansing Water

Processed with VSCOcam with a6 preset

Micellar water has become huge over the last year or so, and I can understand why especially with this one! Does what it says on the bottle, removes makeup (even waterproof), cleanses and soothes. It’s suitable for all over your face, and it does clean really well but isn’t harsh on the skin at all.

I always use this to get the last traces of any make up left on my face using a cotton wool pad. The bottle lasts ages, I’ve just finished this bottle and I’m now trying the combination skin version (still by Garnier, it’s a blue bottle instead).


6. Simple Hydrating Light Moisturiser

Processed with VSCOcam with a6 presetEven if you have oily skin, I would recommend a moisturiser of some sort. This is the best moisturiser that I have found for my skin type, its soaks in really quickly and doesn’t feel heavy on my face.

As it’s Simple, you know it’s not crammed with a load of harsh chemicals that are going to irritate your skin. They do it in the rich and light version. I use both depending on my current skin situation. Most of the time I use the light version.

You need some form of moisturiser purely as a base for your make up. Again, another quality product on a budget.


7. St Ives Apricot Facial Scrub

Processed with VSCOcam with a6 presetYou do need to exfoliate your skin, even just once a week. It removes dead skin cell build up and helps to keep it soft and smooth. I adore this St Ives scrub, it is oil free and made with 100% natural exfoliants, so that’s great for my skin type! I use this twice a week and just feel so much more fresh-faced afterwards!

They do a range of these scrubs, I am yet to try the others but if you have, let me know!


All of the products I have discussed are available from Superdrug (click the titles for links) and most of them are on some form of offer right now (Christmas bargains and all that!). I hope this has been helpful, feel free to ask me any questions and let me know of any of your favourite high street skincare products!

Beth x


Skin Types and Conditions.

Finding skincare products that suit your skin all comes down to matching them to your skin type. Unfortunately, life is never that simple in that we were all blessed with the same, perfect skin. A lot of us have very different skin types and conditions, from dry and dehydrated to extremely oily. Very few of us do have that perfect, flawless skin that we all would give our right arm for (well, I would anyway!).

Most people know what skin type they have, but if it’s slightly harder to tell, you can do questionnaires online to give you some advice, for example; Renee Rouleau Skin Types. I have combination skin; very typical for my age. I have an oily T-zone with normal to slightly dehydrated other areas. Oh and according to one questionnaire I did, I also have signs of ageing skin… I’m only 20!!
Skin types and conditions are different, you can normally categorise your type and then certain conditions follow. Because I have oily skin, I often get blemishes. Those who have dry skin are also dehydrated.

Skin-Types-and-Conditions


You NEED to know your skin type before going on a huge splurge in every skincare brand going. If you have an oily T-Zone like me, the last thing you want to be doing is buying products that are for super dry skin. This will only make your issues worse.
On the other hand, if you have dry sensitive skin with some breakouts, you do not want to be wasting your money on products that your skin will struggle to handle and therefore become even more irritated, dry and pretty damn sore.

So obviously, my blog will be based around products that are for my skin type and the conditions I have. My verdicts on products (good OR bad) are personal to my experiences, so you may get different results. If you have a completely different skin type to me, the products I write about that I think are amazing and have worked for me, may not work for you (and vice versa).

Alongside having a combination skin type, I also suffer with: redness, enlarged pores, breakouts, black/whiteheads, uneven texture and dullness of the skin.

So if you suffer with similar skin issues, the products I talk about should be a good reflection on how they would work for you too. BUT like I keep repeating, everyone’s skin is different!

Beth x


Skincare & Beauty: The new chapter.

Long time no speak! So I’ve taken a very large break from my blog (sorry!) due to, well, the usual reasons. I’m sooo busy with uni, my job and life generally that I’ve had to put my blog on the back burner. My old blog (this blog but old posts) was a bit of a shambles in that I was trying to write posts on all different topics. I’ve decided now I want to reinvent my blog to focus mainly on skincare and beauty. 

skincare blog

Skincare has always been such an important topic to me as I have suffered with mild acne in my early teenage years. Perfect, flawless, pore less skin (if there is such thing) is something that would always be at the top of my “if I could have one wish” list. I am never free for long from breakouts, and I have large pores and redness with some scarring. Basically, my skin is a pain in the arse! I know there are so many women (and men!) out there that have the same problems with their skin every day and struggle to find products to suit due to the millions available on the market.

Due to not having this fairytale like skin, I am equally as obsessed with finding amazing beauty products to help with the issue! I literally spend far too much money on makeup, I just can’t help myself! Makeup is an art the way it can transform a persons face, it genuinely fascinates me. It’s not about being “vain” or “covering up the real you” like some people drone on about, it’s about having some creative fun and enhancing our natural beauty. I genuinely have a lot of fun creating new looks with my makeup, I think I’m fairly good at it (blowing my own trumpet and I don’t care) and most people that know me agree.

Despite me saying it’s not about hiding who you are, for a lot of women makeup is a mask for insecurities that they have been made to feel by other human beings. I for one know exactly what it is to not even want to leave the house because of how my skin looks; being called truly horrible things and made to feel so disgusting and ugly. It definitely effects my confidence when I’m having a bad skin episode!

hiding face

After what felt like years of suffering, I was prescribed medication for my acne which did help to clear my skin up… eventually. But as I said earlier, that does not mean I know have perfect skin aged 20, very far from it. I feel like I have tried every skin care product on the market for clear skin, and even though I have found a few hidden treasures, I’ve found a lot of useless ones and a waste of my money. Being a student working part time in retail, I don’t have the biggest budget for those high end (extortionate) products. So I’m on a mission to find good quality products that do what they intend to at the right price. Not just for myself, but for all the people who suffer daily and those who will suffer from acne at some point in their life. According to the NHS, “about 80% of people between the ages of 11 and 30 will be affected by acne”.

So there you have a basic overview of my reasons to changing the direction of my blog slightly and an insight of posts to come, and I promise to keep up with them!! I already have so many products to talk about; the good, the bad and the very ugly!

I will always be open to trying new products when it comes to skincare and beauty, so I’d love to hear your opinions and recommendations! Of course you always have to remember that everyone’s skin is different, what works for me may not work for you (and vice versa). I will actually do a post more in depth on my skin type so you can compare with what might work or not before you go out and buy a product.

Hope you have a great day!

Beth x

Beautiful Brows Without Breaking The Bank!

Firstly, I just want to apologize for the long periods of time between my blog posts! I am soooo busy right now with my job and uni work It’s hard to fit it all in! Stick with me though, I’ll speed it up soon!

So this blog post is going to be about the importance of the eyebrow! Eyebrow’s frame the face and can completely change your look, so getting them right is key! I look so weird without my eyebrows done (as you will see, sorry in advance) as I have very patchy brows that never grow! I wanted them threaded into a neat shape for my holiday last year and the beautician literally told me there was nothing she could do for them as there was so little there!

Before I show you how I do my brows, I want to remind you that I am not a beautician and this is just my way of doing so by learning from others. I am obsessed with beauty and finding new products, but I am not a product snob. Nothing annoys me more than a woman who will only wear Chanel this, MAC that, but does not know how to apply it correctly and still looks like a clown. No one’s going to know your face is covered in luxury brands if you don’t know what you’re doing with it!

So I had never used this brand before, I stumbled across it during a moment of panic when my old eyebrow pencil ran out (I had sharpened it down until there was like an inch of pencil left, student problems) and my flat mate came to the rescue with this amazing product. I went and brought it the next day…

So this is it, beautyUK’s high brow all in one definition kit and it cost LESS THAN A FIVER! That’s right, this little beauty is an absolute bargain at £3.99! It comes with tweezers and a double ended brush, however I found that the brush was too small to hold so I brought the Revlon duo eye brush that is exactly the same as what you get in the kit just larger and easier to use.

METHOD

So here is my guide to getting beautiful brows, I use the bottom left colour of the palette to suit my natural shade…

Step 1: Brush your eyebrows through to neaten with a standard eyebrow brush/comb.
Step 2: Using the angled end of the brush that comes with the kit (or the Revlon brush in my case) outline the bottom of your brow up to the curve.
Step 3: Using the same angled end of the brush, outline the top of the brow and follow down your natural curve. Join the bottom line to the top.

Step 4: Using upward strokes, fill in the brow from midway towards the curve and down.
Step 5: Using upward strokes again with the angled edge lightly fill in the front half of the brow with a gradual effect so that it is lighter at the start so you can see more of the hairs, this makes the brow look more natural rather than a squared off, harsh edge.
Step 6: Using the flat end of the brush provided, use the pale creamy colour to neaten around the lines of the brow and to make them more defined. I always highlight under my brow bone, this also adds definition and makes you look more glowy!

So that’s it! So easy! I absolutely adore this kit, amazing value for money, you don’t need to spend a lot to have a good product!!
Although I love high street beauty, I am in love with my Naked 2 palette from Urban Decay (which I have on my eyes, shade chopper with bootycall to highlight) and my new Mac lipsticks (Half and Half is what I have on in this photo) which I will undoubtedly blog about soon when I find a spare half an hour!

One final tip, I ALWAYS heat up my eyelash curlers with my hairdryer before using them, they stay perfectly curled all day, I literally never wear falsies this trick works wonders!

Beth x